Tuesday, October 30, 2007

Hooded Baby Towel


Yarn: Worsted Weight 4 ply 100% Cotton approx. 8 - 9 ounces (Peaches and Cream/Sugar and Cream/Lion Brand Kitchen Cotton etc.)
Machine: Bulky 9mm machine, T9
Finished Measurements: 27" wide by 32" long for towel with an additional 9.5" - 10" for the hood, before shrinkage.

E-Wrap 96 stitches (or full needlebed if you want a wider towel). Knit 128 rows, (knit more rows if you prefer a longer towel) backstitch bind off. Rehang center 60 stitches with purl side facing you, (I just take the edge stitches off the machine and leave the center 60 stitches on the machine and e-wrap over them) knit 44 rows, bind off, fold hood piece in half and sew top seam to form the hood, single crochet around the edge of entire piece. I like to do a crochet macaroni bobble for the point of the hood.

You can do a narrower hood, but I like the wider one because when you over lap it to swaddle the baby, it’s more snuggly, in my opinion.

Another option would be to turn the towel on it's side, find the center and add the hood. This would make it wider version for wrapping the baby in.

Copyright belongs to Clarisse Gibson 2007. Please do not sell this pattern or include it in any group of patterns for resale. This pattern is free for you to use as you see fit, as long as you are not selling the pattern itself.

Labels:

Saturday, September 08, 2007

Felted Flap Purse


Felted Flap Purse

Machine: 9mm bulky
Tension Dial: T9
Yarn: Approx. 250 grams of 100% worsted weight wool. (this was a self striping wool from Yarn Treehouse on Ebay. For reference, it's about the same weight as Knit Picks Wool of the Andes)
Finished Dimensions: 9.5"wide x 8" tall x 2.5"deep. 32" shoulder strap

Strap and Bottom/Sides of Bag:
CO 14 stitches and knit 400 rows. Join cast on edge to last row being careful not to twist the strap. Remove from machine.

Back of Bag:
COR. Row counter at 0. With the strap seam at 0 in the middle of the needlebed and purl side facing you, pick up 50 stitches (25-0-25) evenly across (I picked up bars and bumps until it got a little tight then skipped a bump so the strap wasn't too stretched out. I didn't want it to pucker since the strap is also the bottom of the bag). Knit 1 row.
COL. Pick up a bar stitch from strap and hang it on each end of the row. Knit 2 rows, COL. Continue in this manner until 80 rows have been knit and back stitch bind off.

Front of Bag:
Same as Back of Bag except after 80 rows do not bind off. Continue knitting 55 more rows (RC=135) without picking up strap stitches to create the fold over flap. Back stitch bind off.

Felt:
I put my bag into a zippered pillowcase cover and ran it through one hot wash/cold rinse and spin cycle and viola! It was just right :) I put a large cereal box into it for the shaping as it dried.

Oh, and this pattern is free for your personal use, Copyright Clarisse Gibson 2007 All Rgihts Reserved. Please do not sell my pattern or include it in any collection of patterns for sale without my written permission. I know I've seen similar purse patterns on the internet, but I made this one up because I had an idea of what I wanted and I didn't want to spend the time searching the web for a pattern that I probably didn't have the right yarn for anyway. So I hope I haven't inadvertently re-created someone else's pattern, if so, please let me know and I'll take my version off my blog.

If you have any questions, please feel free to ask and I'll do my best to answer them. I'll be embellishing this one with some ribbon and beads on the corners of the flap. As soon as I find the right beads, I'll put up another photo when it's done.

Labels:

Wednesday, September 05, 2007

Machine Knit Felted Pet Bed

Xena Approved!
I was inspired to create this pattern from http://wendyknits.net/knit/kittybed.htm . Thank you Wendy for sharing your creative inspiration :)

Machine: A bulky 9mm knitting machine. As a creative knitter, I'm sure you will be able to adapt it for use on any knitting machine. The yarn you use should be your guide.

Materials: left over bits and balls of 100% wool for felting. The bulk of the bed pictured here was made with Knit Picks Wool of the Andes and Patons Classic Wool, single stranded, and some odd left overs from an unnamed brand. My guestimate is about 400 grams of feltable wool, give or take and one ball of Fun Fur for the edge.

Size: Finished Bed 15" Diameter with a depth of 7 inches on the sides after felting. I had 25 inch diameter before felting. You can adjust the size of your bed by changing the number of needles you cast on.

Bottom of Bed: CO 40 sts WY, knit 6 rows, knit 1 row with ravel cord, COL. Change to Main Yarn and knit 1 row, COR, *place all but the 2 needles at the carriage edge into hold position, knit 2 rows. Push the next 2 needles on the carriage edge back into working position, knit 2 rows, continue until all needles have been placed in working position. End with COR* 1st wedge completed. Repeat steps between the * until 12 wedges have been completed, (10 wedges will work too, but I prefer the shape I get when I used 12 wedges). Join the first wedge to the last wedge by re hanging the stitches from the first wedge and pulling them through the stitches from the last row. (You can graft it for a seamless join, but since it's a pet bed, I didn't feel the need to do that much work. The seam felts into the bed and isn't visible when looking into the bed, but does show when you turn it over and look at the bottom). Remove waste yarn by pulling out the ravel cord and bind off with back stitch bind off, sew the center hole closed.

Side wall of bed: Ewrap CO 20 sts. Using the Seam As You Go (SAYG) method to join panels, hang the first bar stitch on the edge of the bottom section onto the last stitch on the left on the needlebed. Knit 2 rows. Hang the next bar from the edge of the bottom section on the left side, knit 2 rows. Hang the next 2 bars, a decrease is made, knit 2 rows. (The decreased stitches are what make the side walls stand up after the bed is felted). Continue in this manner until all bars have been picked up and knit onto the side panel. Join to beginning cast on by pulling the first cast on stitches through the last stitches knit and back stitch bind off.

Fur Edge of bed: Ewrap CO 8 sts with the wool yarn. Using the Seam As You Go (SAYG) method to join panels described above, knit with 2 strands of yarn, one of wool and one of fun fur stranded together. Since this is not a shaping panel but an extension of the wall you will be picking up every bar stitch instead of making a decrease by knitting 2 rows together as you did above. Join the beginning cast on stitches by pulling them through the last row knit and back stitch bind off.

Weave in your ends and run through the washer in hot water to felt. Shape while wet, I use an upside down round laundry basket for this size bed.

*** I've already decided that on the next one I will only use 5 stitches to make the fur edge. I don't think it needs to be that wide. ***

****If you want a thicker, stiffer sided bed, you can double strand your yarn or use one of the more chunky weights available for felting. And yes, when I used to cut my childrens hair, I followed them around for a week with scissors in hand to snip away strays :)****

I hope this is clear. If you have any questions, feel free to shoot me an email and I'll do my best to clarify for you. These instructions are free for your use. Please do not ad it your website or blog or include it in any collection of patterns that are to be used to make a profit without my written permission. Linking to this post is a perfect way to share the pattern with other machine knitters :) Copyright Clarisse Gibson 2007 All Rights Reserved

Is it ready yet? Stimpy is the curious one :)

Labels:

Tuesday, July 03, 2007

Cotton Hand Knit Reggae Hat


My hat was inspired by the Rasta Hat pattern from Knitty Gritty on DIY. Here's the link to their pattern if you want to have go at it http://www.diynetwork.com/diy/na_knitting/article/0,2025,DIY_14141_5312018,00.html

I used 2 (2oz) balls of Peaches and Cream 4 ply Worsted Weight 100% cotton, ya know, the stuff that makes the great wash cloths. Size 7 - 16" circular needles and size 9 - 16" circular needles and 4 size 9 double point needles when the decreased sections were too small for the circs.

CO 76 sts. join for circle place marker for start of round and K1P1 rib for 1 1/4" slipping marker as you come to each round.

Row 1: K2 M1 around in plain knit stitch, slip marker, 114 stitches on needle.
Row 2 - 6: Knit, slip marker each round
Row 7: *yo K2tog* repeat around, slip marker
Row 8: Knit, slip marker
Row 9: *yo K2tog* repeat around, slip marker
Row 10: Knit 4 more rounds., slip marker each round

Repeat rows 7 - 10 until piece measures 6 to 10 inches. Length will depend on how much hair/dreds you are tucking into the hat. End with 3 rows of plain knit, the 4th row you will split into 6 sections of 19 stitches using markers so you know where to do your decreases.

This is the tricky part. You will be alternating a decrease row with a plain knit row, while maintaning your established lace pattern. What happened with me was that I ended up having to fudge it here and there with the yarn overs but it all worked out fine.

Decrease row *ssk (a left slant decrease) knit in established pattern to 2 stitches before marker, k2tog (a right slant decrease) slip marker* repeat between *.
Knit next row even in established pattern. Change to double point needles when number of stitches will no longer stretch around the circular needles.

Decrease to 2 stitches between sections, a total of 12 stitches. Using a yarn needle gather up these remaining stitches, pull tight and tack closed.

You can leave your hat like this or you can add the brim. The brim is kind of what makes the hat cool in my opinion :) But if you choose not to, just thread a 21 inch length of cord elastic through the inside loops of your ribbing, I did mine the first row after the cast on row, tie a not and weave in the ends.

For the Brim:

Row 1: pick up and knit the 16 center sts
Row 2: Purl
Row 3: K2, M1, place marker, K12, place marker, knit 2 and pick up next 2 sts from cast on row knitwise
Row 4: Purl to end, pick up one more st from cast on row purlwise
Row 5: K to marker, M1, Slip marker, K12 center sts, slip marker, M1, knit to end, pick up next 2 sts from cast on row knitwise
Row 6: Purl to end, pick up 2 more sts from cast on row purlwise
Repeat rows 5 and 6 until brim measures 2" from center
Next row: (RS) Purl 1 row (turning row)
Next row: (WS) BO first two stitches, but slip first stitch before binding off rather than purling it. Purl to end.
Next row: (RS) BO first two stitches, slipping first stitch before BO instead of knitting it. Knit to 2 stitches before marker, SSK, Slip marker, knit next 12 stitches, slip marker, K2tog knit to end.
Repeat last 2 rows until only 16 stitches remain.
BO 16 remaining stitches.

Labels:

Wednesday, December 13, 2006

My Favorite Dish Cloth Pattern

Tuck/Purl Side
Stockinette Side

****UPDATED PATTERN****

The 2 row tuck uses less yarn and works just as nice as the 3 row version

This one was made on my Toyota KS610, a 9mm comparable to the Brother 230. It would be just as easy on an 8mm like the Bond ISM/USM or the Singer HK100, or a punchcard bulky machine.

Tension set at loosest setting (10 on mine). E-Wrap cast on 29 needles. Knit 2 rows plain. Set needles and carriage to tuck on every other needle beginning with the 3rd needle from edge in hold/tuck position, knit 2 rows. Set carriage (or needles on basic manual machines) to knit all needles and knit 1 row. Repeat this process for 64 rows. Knit 1 more plain row, 65 rows all total on row counter and carriage on left. Back stitch bind off and do a single crochet around the edges. I use a size I crochet hook and make a stitch in each knit stitch across the top and bottom and crochet into the bars on the sides, skipping every 3rd bar. That's it! My old favorite was on the Bond with a tuck Fisherman Rib hand manipulated, this is sooo much faster and a really nice weight yet loose weave cloth.

Those of you with punchcard machines can use the card that looks like this:

xoxoxoxoxox
xoxoxoxoxox
xxxxxxxxxx
xoxoxoxoxox
xoxoxoxoxox
xxxxxxxxxx

with the x's being the knit stitch and the o's being the tucked stitch and leaving yourself 2 knit edge stitches on each row.

The other stitch pattern I like is the same as above but instead of columns of tucked stitches for the ribbed effect, the tucked stitches are alternated and a card would look like this:

xoxoxoxoxox
oxoxoxoxoxo
xxxxxxxxxx
xoxoxoxoxox
oxoxoxoxoxo
xxxxxxxxxx

with alternating 2 and 1 knit stitch on the each edge.

Hope this makes sense :)

Labels:

Friday, July 14, 2006

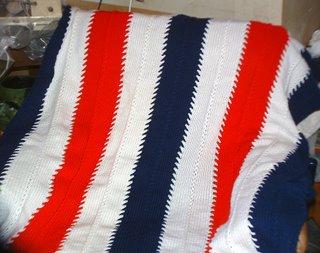
Patriotic Afghan


Red Heart Super Saver: Soft Navy, Cherry Red and White I'm not sure how much was used since they weren't new skeins but maybe 1.5 red and 1.5 white and 2 blue?
Singer LK100
T:4 or Bond with Keplate 3 would probably work
Gauge : 15 sts x 24 rows=4”
There are 9 panels I started with the center panel which has the eyelet on both sides.

With Soft Navy, e-wrap CO 20. Knit 4 rows and transfer the 2nd stitch from the end to the next stitch over to create 1 eyelet on each end. Make the eyelet on each side every 4th row for 355 rows. Knit 4 more rows for a total of 359 rows and knit onto 6 rows of waste yarn. Unravel 2 center stitches and mock cable by using a crochet hook (I used an I hook) to latch up the "run" you just unraveled. Begin at the CO edge and twist 3 bars of yarn around hook to make the loop you will draw the next 3 bars of yarn through. Continue this up the panel until you reach the waste yarn. Rehang all the live stitches and bind off. You will want to be sure your loop is on the stockinette side otherwise your mock cable will be on the purl side of your panel.

With White, e-wrap CO 20 and knit 4 rows. Using the eyelet join method attach the white panel to the Navy. You will have the join on one side and create the eyelet on the opposite side to allow you to join the next panel.

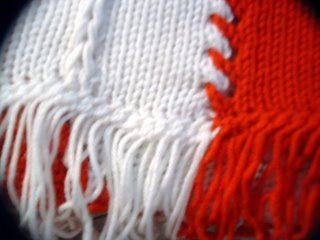
Continue in this manner but only join the final edge panels without making the eyelet on the outer edge until all 9 panels are joined together. I did toy with the idea of creating the eyelet holes on the outside edges too and then do a narrow strip joined to roll the opposite way to finish the edge but ended up with a piecrust edge on the sides and the crab stitch fringe from http://webpages.charter.net/langkilde/Fringes.html

If this doesn't make sense, please let me know and I'll try to write a better pattern. It's really just a variation on the paneled afghan in the book that comes with the Bond machine and the eyelet join from the Yahoo Incredible Sweater Machine group and the Friendship Afghan pattern from http://www.clearwaterknits.com/freepats/afghan.html

Labels:

Wednesday, July 05, 2006

Slipper Pattern


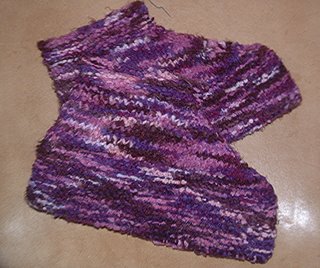
I have been asked by several people for the pattern I use to make these slippers. The pattern I use is from memory. It was a high school classroom assignment way back in 1969 and my teacher had given us "ditto's" of the pattern. I made it so many times that it committed itself to my memory, but there is a similar pattern on the net called Dorm Boots and it's very similar.
That webpage is http://www.needlebeetle.com/free/boots.htm scroll down to the original pattern, the one knit on 2 needles, not knit in the round. The main difference is that I combine Red Heart Super Saver with what ever yarn I am using, knit (with 2 strands held together) for 20 rows to get a wider sole and it comes up over the sides of the feet to add extra warmth for the toes, break off the Super Saver and continue with one strand of yarn for the rest of the slipper. The other difference is that I do the cuff with a plain old garter stitch, usually 16 rows for 8 ridges.

Ok, a few other differences, so here is all of them... I use size 8 needles, cast on 76 sts with double strand of yarn, K 20 rows in garter stitch for sole, break off one strand and continue with one strand of yarn. Decrease down to 36 sts ( the decreases are done exactly like their pattern) then garter stitch the top cuff and bind off very loosely.

I hope this helps, they are a very good learning project. I remember stressing out about the Knit 2 together from the back. It confused me to no end, then I figured out that it was so the top stitch would look the same on both sides of the slipper. There is a little almost slip stitch looking ridge down the front.

Labels: